The long awaited overhaul of Grand Theft Auto V is finally here, and it is b-e-a-utiful! Visually stunning graphics upgrades, and subtle yet significant AI upgrades make this mod a must have for any GTA fan.
For those looking to download and install the mod on your system, here’s a complete guide on doing so:
System Requirements
In order to run the Grand Theft Auto 5 Redux, you MUST meet the following requirements.
- A copy of Grand Theft Auto 5. (Pirated copies NOT supported)
- Download, and install OpenIV
- Download, and install ScriptHookV
- A minimum 70GB extra disk space available. (GTA 5 Redux is kept in a mods folder away from your original game files, allowing access to GTA 5 Online and remove the mod.)
- A PC that can comfortably run GTA 5 vanilla at a decent FPS. (Since GTA5 Redux improves graphics expect a frame drop of around 5-15 FPS (depending on ReShare option selected) compared with the vanilla version.)
Download
Please ensure you download both GTA_REDUX.zip andREDUX_PATCHDAY1.zip
GTA5_REDUX.zip
Full download of GTA 5 Redux
Size: 3.3GB
Mirror: Gamestand.net
MD5 Hash: 295668e1d3729f947bbbd1329a42a888
REDUX_PATCHDAY1.zip
Patch for GTA 5 Redux.
Size: 1MB
Mirror: Gamestand.net
GTA5_REDUX+PATCHDAY1.torrent
Torrent file for GTA_REDUX.zip & REDUX_PATCHDAY1.zip
Mirror: Gamestand.net
Installation
Make sure to follow all the steps in order. It is recommended to begin the installation from a fresh download/copy of the game (unmodded/vanilla).
*** Note *** You must install the DAY 1 PATCH after following this tutorial. Run it in the same fashion as you did the full installer, choosing “game folder” as your install location)
Video Guide:
1) Download and install OpenIV, as well as all the plugin-ins it will prompt you with.


Note: If you are not prompted to install the plug-ins, click on tools, then“Asi Manager” and install all the plug-ins listed

2) Download ScriptHookV, and copy and paste the files ScriptHookV.dll, and dinput8.dll from the “bin” folder, into your Gta 5 main directory.


***IMPORTANT NOTE*** Before starting the next step, make sure you have 100% clean, un-modded files in your Gta 5 directory. No previous ReShade, ENB, SweetFX, or other mod files can be previously installed.You have been warned! ***NOTE***
Files/folders to delete from directory: ReShade(folder), ReShade.fx, dxgi.dll, ReShade64.dll, d3d11.dll, enblocal.ini, enbseries.ini, enblightspright.fx, and, enbseries(folder)
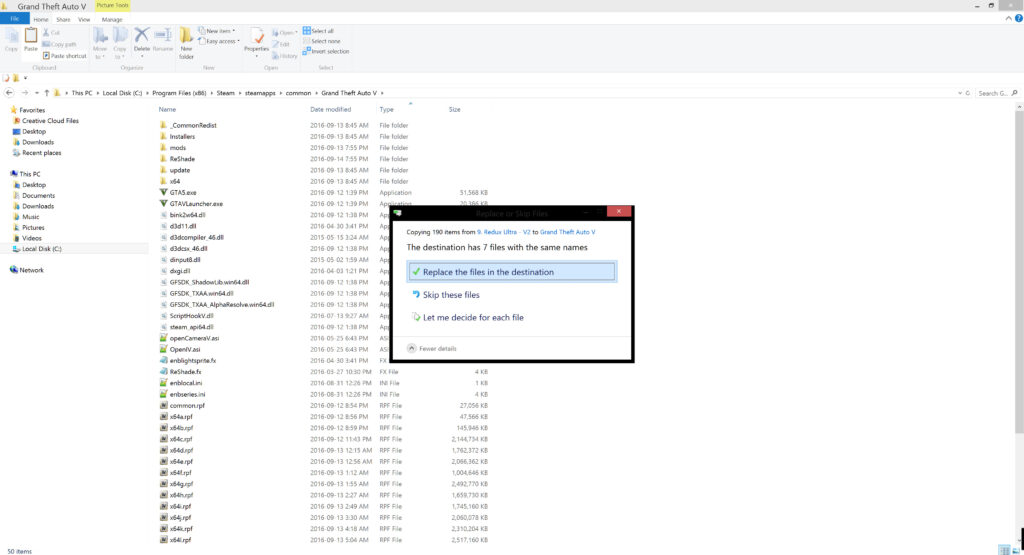
3) From within Windows, create a folder titled mods inside your GTA 5 main directory, and copy and paste the files: update, x64, common.rpf, and x64a.rpf-x64w.rpf, from your main directory, into the newly created mods folder. (YES, this means ALL of the rpf files! Failing to copy all parts required for the mods folder will result in a failed installtion, and missing features)


Note: This step requires copying ALL original “.rpf” files into the mods folder, essentially creating an entire copy of the game to be modded. Copying all of this data will take some time, please be patient!
4) After successfully setting up your mods folder, use the Package Installer tool from within OpenIV (click on tools, then “Package Installer”) to locate the REDUX_INSTALLER.oiv file from the extracted Redux download.


5) Click “Install”, then choose the option to install the mod inside theGAME FOLDER.

(Note- Choosing to install inside the mods folder will result in a duplicated file system, and ultimately a broken installation)
6) Game files installation complete! Now time for the ReShade and ENB!
(Note- If you receive a message stating that the installer has failed, attempt to run the installer again. If it fails a second time, please ensure you have properly set up the mods folder. Do not close the installer during installation, please wait for it to finish unless the program stops responding. Please watch the video below if you require a more detailed tutorial)
Reshade & ENB Installation
1) Open up the extracted Redux download, and navigate to the“RESHADE OPTIONS” folder.

2) Choose your desired option from the list of presets, open the folder and copy its entire contents.

3) Paste the contents of your choice, into the main GTA 5 directory, overwriting everything when asked.

4) COMPLETED!!!
***NOTE*** When you want to CHANGE presets, DELETE the entireReShade folder from your directory. Then copy and paste the contents of your new choice into the directory, overwriting all other files.
Additionally, it is 100% “OK”, to be seeing YELLOW warning messages from ReShade when starting up. However RED indicates a mistake has been made, and the effects are not successfully compiled. Repeat the step that indicates how to change ReShade options if this occurs.

Troubleshooting
1. Installation Issues
Getting the installer to run
If you are receiving errors from the auto-installer, stating it cannot find the assembly.xml file, or any other errors, make sure you have completed the following installation steps.
- Make sure you have extracted the downloaded GTA5_REDUX.zip before running the installer.
- Run OpenIV in administrator mode. (right click OpenIV icon, and “run as administrator”)
- Ensure you have installed all the required OpenIV asi scripts. (From within OpenIV, click on tools, then asi manager. INSTALL ALL PLUG-INS LISTED!)
- Ensure you have installed ScripthookV and you have copied and pasted the files dinput8.dll, and ScriptHookV.dll into your GTA 5 main directory. DELETE any file titled dsound.dll that is in your directory!
Points of FAILURE
a) If you click install, and do not receive an option to choose either game folder or mods folder. You have not properly installed the asi plug-ins from openIV, or the ScriptHookV files.
b) If the installer cannot open an RPF file, find the assembly.xml, or provides other errors, you must make sure you are running the program as administrator, and you have fully extracted the downloaded zip file.
2. Loading Crashes
Step 1. Determine the result of the crash
In order to do this, we must remove all the ReShade and ENB files, and attempt to launch the game. (Files to remove/delete – ReShade (folder), enbseries (folder), d3d11.dll, dxgi.dll, enblightsprite.fx, enblocal.ini, enbseries.ini, and ReShade.fx)
If your game runs after removing the files, then the result was ReShade and ENB, please continue to Step 2. of this section.
If after removing all the files, your game still continues to crash during loading, please refer to Step 3. of this section, then continue with Step 2.
Step 2. Dealing with ReShade & ENB loading crashes.
a) The first thing to do is install the 1. Redux (original) preset. This option was configured using an older, and more stable version of ReShade. If your game still crashes with this preset, open up your GTA 5 main directory, and complete the following:
Rename the dxgi.dll *file* to ReShade64.dll
Open your enblocal.ini file,
locate the line –
ProxyLibrary=d3d11.dll
And rename it to –
ProxyLibrary=ReShade64.dll
(make sure you save the file after your changes)
If your game successfully launches after this step, you will need to apply this fix to every ReShade Option you try.
b) If your game ran successfully when using the the Redux original preset, yet crashes while using other ones, try the following: (make sure to read the note for this section)
- Make sure you have ZERO applications running. Close down any background applications as well, including simple browsers, or even windows explorer.
- Set steam to run in offline mode, and disconnect from the internet. OR create a text file titled commandline.txt and place the following line inside it
-scOfflineOnly
(this file must be placed inside your main GTA 5 directory, and you must have previously ran the game with an online connection)
***NOTE*** REPEAT THE LAUNCH PROCESS! Unfortunately, due to the version of ReShade, there will almost always be some loading crashes with different presets. In some cases, completing the prior steps resolves the problem, and the game will launch. Other times, simply re-launching will provide the fix. However, the instability is only during launch, once in -game, any crashes experienced are not due to ReShade.
Additional info: Some of the presets will display a yellow warning message when launching the game. This is 100% normal, and is not a problem. However, if you see red error messages displayed, there has been a mistake in copying over the data. Make sure to delete the ReShade folder from your directory, before copying over another preset. Overwrite all files when asked!
Step 3. Correcting loading crashes that arenot a result of ReShade & ENB
If you have followed the previous steps, and determined that your loading crashes are not coming from ReShade & ENB, complete the following:
(check out the Requirements page to make sure you are following the exceptions before continuing with these steps)
- Re-download and install a fresh copy of GTA 5, and make sure you have all the required updates. Current version is: 791.1
- Run the game once, and create a save.
- Create the mods folder ensuring you are using a copy of this data!DO NOT use an older version of the game, a modded version, or anything other than the data you have just tested and ran. (steps to create the mods folder can be found “here”)
- Continue with the installation process as normal. Use OpenIV to locate the REDUX_INSTALLER.oiv file, and install it into the “GAME FOLDER” option. (This will still put the files into the “mods” folder, due to the way the installer was configured.)
- When running OpenIV, right click and run as administrator. MAKE SURE YOU HAVE EXTRACTED THE GTA5_REDUX.zip BEFORE TRYING TO RUN THE AUTO-INSTALLER!!!!
- DON’T FORGET TO INSTALL THE DAY 1 PATCH AFTER THE FULL INSTALLATION. Simply follow the exact same steps as running the full installer package, choosing “game folder” as the install path.
- Run the game prior to installing any of the ReShade presets.
- If you have followed all the steps correctly, you should have a successful installation.
2. Effect/Features Not Found In Game
If you have installed the project, yet are unable to see/experience some of the new features, follow these steps to correct the issue.
- Delete your mods folder, and create a new one!(the most common reason for not seeing all features, is that not all the original data was successfully copied into the mods folder.)
- When creating the mods folder, make sure you are using game data that you have tested to successfully run! Make a copy of the exact files you have tested. DO NOT USE OLDER GAME DATA, MODDED DATA, OR ANYTHING FROM ANOTHER LOCATION.
- Here is a list of the exact files and folder that need to be directly copied from a working version of the game, into the mods folder that you created in its main directory:
update (entire folder),x64 (entire folder), common.rpf, x64a.rpf, x64b.rpf, x64c.rpf, x64d.rpf, x64e.rpf, x64f.rpf, x64g.rpf, x64h.rpf, x64i.rpf, x64j.rpf, x64k.rpf, x64l.rpf, x64m.rpf, x64n.rpf, x64o.rpf, x64p.rpf, x64q.rpf, x64r.rpf, x64s.rpf, x64t.rpf, x64u.rpf, x64v.rpf, x64w.rpf.
Look here for more.
Video Guide Below:
For more news and reviews, keep checking back at Gaming Central.